Overview
This article presents a comprehensive step-by-step guide on implementing a PWM (Pulse Width Modulation) controller for fan systems. It underscores the critical role of PWM in regulating fan speed, which leads to enhanced cooling efficiency and reduced noise levels. The guide includes detailed instructions for:
- Gathering necessary components
- Connecting the PWM controller
- Troubleshooting common issues
By following these steps, users can significantly improve fan performance and reliability.
Introduction
Pulse Width Modulation (PWM) has fundamentally transformed fan operation, enabling precise control over speed and efficiency. By mastering the implementation of a PWM controller, enthusiasts can significantly enhance cooling performance while minimizing noise levels in their systems.
However, the journey to effective fan control often presents challenges, including:
- Selecting the appropriate components
- Troubleshooting common installation issues
What essential steps must one take to ensure seamless integration of PWM technology into fan systems, and how can potential pitfalls be effectively avoided?
Understand PWM and Its Role in Fan Control
Pulse Width Modulation (PWM) serves as a PWM controller for fan speed regulation by varying the width of the pulses within a signal. In fan configurations, the use of a PWM controller for fans facilitates precise speed adjustments, which can lead to improved cooling efficiency and reduced noise levels. A typical PWM fan is equipped with four wires:
- Power
- Ground
- Tachometer
- PWM signal
The PWM signal modulates the power delivered to the fan, enabling it to operate at varying speeds contingent upon the duty cycle of the signal. Understanding this concept is crucial for the for fan systems, as it directly impacts both performance and energy consumption.

Gather Required Components and Tools
To effectively implement a PWM controller for your fan system, it is crucial to gather the following components and tools:
- PWM Controller: Choose a controller that is compatible with your fan type, whether it be 3-pin or 4-pin. It is important to note that 3-pin units are voltage-controlled, while 4-pin models use a PWM controller for fan speed regulation. Ensure that the cooling devices are PWM-capable, and for optimal performance, it is recommended to use a PWM controller for fans, particularly 4-pin models, due to their efficiency and low noise operation. Gagner-Toomey Associates offers a broad range of DC input Tube Axial devices, varying from 15 – 280mm, optimized for performance, efficiency, and low noise, with IP protection available upon request, making them ideal for your cooling requirements. The standard thickness of most units utilized in PC cooling is 25mm, which is essential for compatibility and performance considerations.
- Power Supply: Utilize a power source that meets the voltage specifications of your devices, typically 12V.
- Wires and Connectors: Ensure you have sufficient wiring to link the PWM regulator to both the ventilators and the power supply.
- Soldering Kit: This may be necessary for making secure connections, depending on your setup.
- Multimeter: Employ a multimeter to verify connections and check voltage levels.
- Screwdriver: A screwdriver will be required for securely attaching the controller and ventilators.
Moreover, consider that the noise levels of ventilators are measured in decibels (dB), ranging from 15dB to over 65dB, which can significantly affect your design’s acoustic performance. The longevity of the devices is also influenced by their bearing types, which include sleeve, ball, fluid, and magnetic bearings. By assembling these components in advance, you can streamline the installation process and mitigate potential delays.

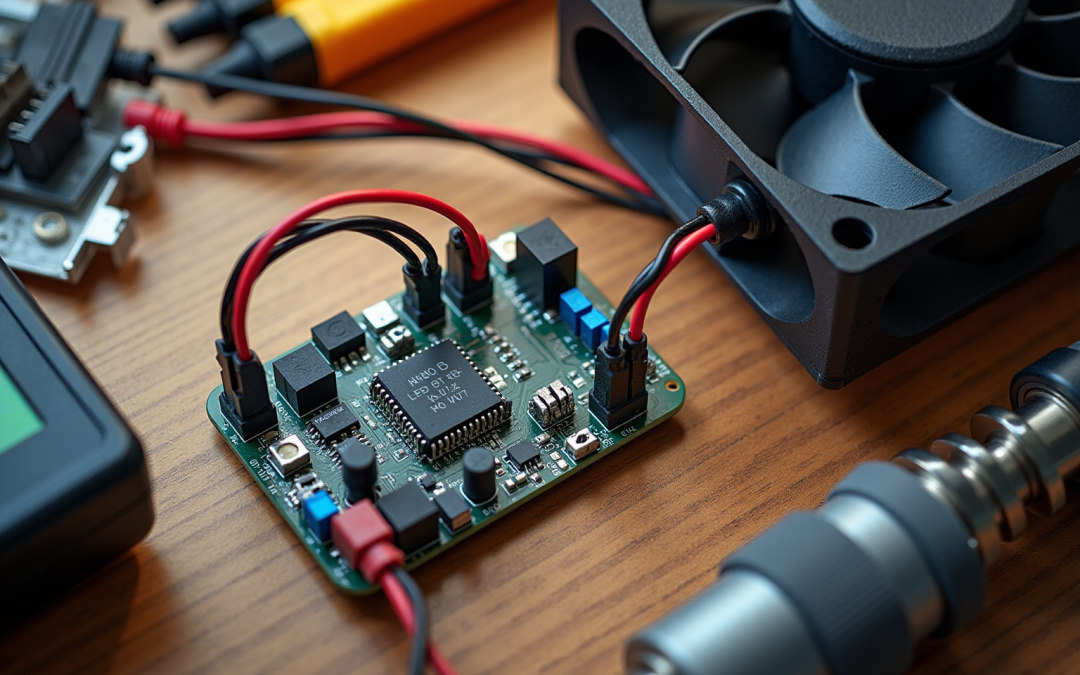
Connect the PWM Controller to the Fan System
To effectively connect your PWM controller to the fan system, adhere to the following comprehensive steps:
-
Identify the Fan Connectors: Begin by locating the PWM controller for fan pin connectors on your PWM-capable fans. The pins are typically designated as follows:
- Ground,
- Power,
- Tachometer,
- PWM Signal.
-
Connect the PWM Controller:
- Attach the ground wire from the PWM controller to the ground pin of the fan.
- Link the power wire from the PWM controller to the power pin of the fan.
- If applicable, connect the tachometer wire from the fan to the tachometer input on the PWM controller device.
- Finally, link the PWM signal wire from the device to the PWM controller input pin.
-
Power Up the Equipment: Once all connections are secured, activate the equipment and monitor for any signs of malfunction. Utilize a multimeter to verify that the correct voltages are present at each connection point.
Test the fan operation by using the PWM controller to adjust the PWM signal and evaluate the fan speed. Confirm that the fan responds appropriately to variations in the signal from the PWM controller.
Common mistakes during the installation of a PWM controller for fan include incorrect pin connections and neglecting to verify voltage levels, which can lead to operational issues. For example, a user named Khuminis encountered a ‘CPU Fan Error!‘ message due to improper BIOS settings. Community member bprat2 suggested that when utilizing water cooling setups, the in the BIOS. This underscores the importance of meticulous configuration and troubleshooting.
Statistics from the community reveal that numerous users face connection issues with PWM fan setups, often arising from misidentified connectors or incorrect wiring. By following these steps and being vigilant about common pitfalls, you can ensure a successful installation and optimal performance of your cooling system, especially when using a PWM controller for fan.

Troubleshoot Common Implementation Issues
When implementing your , you may encounter several common issues. To assist you in resolving them effectively, consider the following troubleshooting tips:
- Fan Not Spinning: First, verify that all connections are secure. Confirm the power supply is functioning and providing the appropriate voltage; for instance, 5-V units typically require a minimum of 3.5 V to initiate rotation, while a 12-V device may need at least 7 V.
- Inconsistent Fan Speed: Ensure the PWM signal is being transmitted correctly. Utilize a multimeter to measure the duty cycle and frequency of the PWM signal, as inconsistencies can lead to erratic fan performance.
- Noise Issues: Excessive noise from the fan may indicate incorrect PWM frequency settings. To minimize audible noise, ensure the PWM frequency is set above 25 kHz, as high-frequency PWM (>20 kHz) significantly enhances acoustic performance.
- Overheating: If the fan or controller is overheating, inspect for short circuits or incorrect wiring. Additionally, verify that the power supply is adequate for the number of fans connected, as insufficient power can lead to overheating and performance issues.
By adhering to these troubleshooting steps, you can effectively address common challenges and ensure your PWM fan operates efficiently and reliably. As Daren Perez noted, “PWM is a tool that allows engineers to balance these variables based on the demands put on their system at any given time.” This balance is crucial, particularly in compact electronics where heat dissipation poses a significant challenge.

Conclusion
Implementing a PWM controller for fan systems represents a transformative strategy for enhancing cooling efficiency and reducing noise levels. By mastering the intricacies of Pulse Width Modulation, users can achieve precise control over fan speeds, ultimately leading to optimized performance across various applications.
Throughout this discussion, key components have been underscored, including:
- The necessity of a compatible PWM controller
- Proper wiring
- The significance of troubleshooting common issues that may arise during installation
Each step, from gathering tools to connecting the controller, is crucial for ensuring a successful setup. Furthermore, understanding the electrical requirements alongside the role of fan bearings can significantly impact the longevity and functionality of the fan system.
In conclusion, the implementation of a PWM controller not only enhances cooling efficiency but also improves the acoustic performance of fan systems. By adhering to the outlined steps and being mindful of potential pitfalls, users can effectively harness the power of PWM technology. Embracing this knowledge empowers individuals to create more efficient and quieter cooling solutions, establishing it as a valuable skill in today’s technology-driven landscape.
Frequently Asked Questions
What is Pulse Width Modulation (PWM) and its purpose in fan control?
Pulse Width Modulation (PWM) is a technique used to regulate fan speed by varying the width of the pulses in a signal, allowing for precise adjustments in fan speed.
How does a PWM controller improve fan performance?
A PWM controller facilitates precise speed adjustments in fans, which enhances cooling efficiency and reduces noise levels.
What are the typical components of a PWM fan?
A typical PWM fan has four wires: Power, Ground, Tachometer, and PWM signal.
How does the PWM signal affect the fan’s operation?
The PWM signal modulates the power delivered to the fan, enabling it to operate at different speeds based on the duty cycle of the signal.
Why is understanding PWM important for fan systems?
Understanding PWM is crucial for effectively implementing a PWM controller in fan systems, as it directly affects both performance and energy consumption.